How To Keep A Tidy Office

The frequency that cleaners are required to clean premises comes down to the type of business and traffic they experience.  For instance businesses in the retail and hospitality industry often require daily cleans in order to maintain a polished image, entice customers and encourage their return business. Office cleaning does not have the same intensity, so many of our customers prefer our professional cleaning to be conducted on a weekly or bi-weekly basis.

It’s well understood that a clean and tidy office environment will increase hygiene, enhance company morale and customer relations. This in turn leads to a boost in productivity. So we’ve come up with a list of handy hints in order to maintain a clean and tidy environment in your office in between visits by your professional cleaners:

  1. Tidy Desks: Maintaining a tidy desk assists in work performance and productivity. It also enables the desk to be cleaned thoroughly. Make use of items that will maintain order such as desk drawers for storage, desk organisers, pen holders, In and Out baskets.
  2. Wet Wipes: Have at arm’s reach wet wipes or disinfectant and paper towel to clean up any accidents, spillage, coffee marks you may leave behind during the course of the day.
  3. Food Storage/Disposal: Food often is a source of odours within the office. This can be reduced by making use of the proper storage facilities such as a drawer or the kitchen refrigerator. Dispose of foods in the bins located in the kitchen or outside office area rather than at your desk.
  4. Hang Items: Slinging items of clothing over chairs or desks makes the office look cluttered, unkempt. Make use of cupboards or if not available use hooks or coat stands.
  5. File Cabinets: Once any work is completed, file any documents/folders that are no longer required. Aim to keep the out tray clear as well. Not only does it make your desk look tidy but creates order and keeps you feeling in control.
  6. Coffee Mugs: Most people enjoy a cuppa whilst working, some can’t work without one. If you fit into this category, make use of coasters to prevent coffee rings on your desk and return mugs to kitchen and clean. Don’t leave dirty mugs on your desk.
  7. Pickup Rubbish: Rubbish lying on the floor makes the office look dishevelled even chaotic. A few suggestions, have the bin close by, avoid going for the long hoop shot – it’s amazing how many of us are poor shots and then too lazy to pick up after ourselves. Make sure you pull out staples over the bin rather than letting them fall to the floor embedding themselves in the carpet. Empty the bin when it gets full, don’t allow it to overflow.
  8. Air Freshener/Incense: An office with bad odours are off putting for staff and visiting clients. Combat these smells with air fresheners or incense as some of my clients tend to use.
  9. Avoid Office Clutter: Tidiness applies not only to the desk, look at the entire office space. Dispose of any unwanted items that maybe on shelves or on the floor. Folders and boxes lying on floors for months at a time are commonplace. If they are not required, move them to where they belong. This helps avoid trip hazards, allows for better cleaning of carpets by cleaners and makes your office look presentable.
  10. Start Afresh: Before you leave for the day spend a few minutes to tidy up your desk and office. You’ll appreciate it the next day and if the cleaners are due in that night, so will they.

Follow these easy tips, make it a routine and your office will remain hygienic and tidy throughout the week, not just following the professional cleaners.  Remember, a clean office promotes a healthy working environment, improved work performance, and supports better customer relations.


Tips to Window Cleaning (Part 2)

The excellent results achieved by professional window cleaners comes as a result of many hours of intensive work where one learns the tricks of the trade, whether it be via a schooled professional or more commonly trial and error. I previously listed the equipment commonly used by professionals when cleaning windows and will now explain the technique I use to employ this equipment. Follow this guide and you too can have windows that glisten with that much wanted professional touch.

The first step is to fill the bucket with water and add your detergent; my personal choice is Morning Fresh, this will assist in lubricating your squeegee to glide over the surface of the glass. Next add methylated spirits to your water, I do this so as to aid evaporation which helps prevent streaks.

We’ll assume the windows we are to clean are free of debris; we’ll look at tips on cleaning windows after a builders clean in a later post. First I would apply the detergent to the glass using my washer. In the event the glass hasn’t been cleaned for quite some time and is covered in grime the doodle bug with its scouring pad will be useful in scrubbing the window. Ensure the pad and the glass are free of any debris that may scratch the window pane. You will eventually develop a feel of the doodle bug and notice that it glides so much easier as it frees the window of its grime.

With the glass now covered in your cleaning solution we take a hold of our squeegee and look to the top of the window. Apply the rubber corner of the squeegee along the edge of the glass or you could use a cloth, make sure the cloth is free of lint, like a microfibre. The purpose of wiping the top edge is to prevent solution running down your glass when you squeegee the solution off the glass.

For the novice let’s begin with the easiest technique. Place the squeegee horizontally at the top left of the window. Now run the squeegee straight down the window in a vertical direction. Keep constant pressure on the window all the way down to the bottom, with practice you will develop a feel as to how much pressure on the squeegee you will require, too little or too much will leave streaks.  Wipe your rubber with a cloth then return to the top and repeat this action to the right side of the area just cleaned, have the squeegee overlap the cleaned area by about 3 cm, repeat this until you reach the right side of the window.

The window is now clean so let’s dry the side and top edges with a dry cloth, using your finger to run along the edges. At the bottom of the window you will need to mop up the excess water on the sill then use your dry cloth to dry the bottom edge.

Step back and inspect your work. Look from different directions to try to detect any streaks or marks left on the pane. Marks can appear from different angles. Should you detect any streaks use your dry lint free cloth. If there are too many streaks then it’s easier to start the process again by applying the solution to the window. For stubborn marks I tend to use grade 0000 steel wool, designed for polishing glass. Of course the window isn’t truly cleaned until both sides are done.

A couple of warnings, on hot days your solution can evaporate quickly, this can cause friction with your squeegee on the glass resulting in streaks. Also, your worst enemy is the sun. A window that looks perfectly clean in the morning may show horrible streaks once the sun shines through so the key is to develop a keen eye for spotting those marks on your window.

For the next technique, again for novices, run your dry cloth down the left edge of the pane. Now hold the squeegee vertically and place it along the left edge of the window at the top. Run the squeegee straight across the window in a horizontal direction. Keep constant pressure on the window all the way across to the right side of the window. Wipe your rubber with a cloth then return to the left and repeat this action to the bottom of the area just cleaned, have the squeegee overlap the cleaned area by about 3 cm, repeat this until you reach the bottom of the window.

The technique most professionals use is to glide the squeegee across the window in one fluid motion, without lifting the rubber blade, to prevent stopping and starting. This speeds up the process. I start at the bottom left side of the window, move upwards to the top of the window, with the squeegee slopped towards the centre of the glass to allow for run off. Then without lifting the blade, move across the top then down the right side, all the way pushing the detergent to the centre of the glass. Again, without lifting the blade, move to the top of the window, overlapping the cleaned area by a few centimetres and always pushing the solution to the centre. Now snake your squeegee down the glass to the bottom.  Mop up the sill, dry the edges, step back and inspect. Correct any blemishes then you’re done.

So there you have it, gleaming clean windows, just like the professionals.

Tips to Window Cleaning (Part 1)

If you want professional results when cleaning windows you’ll need to acquire the right equipment and learn the proper technique. The equipment is relatively cheap for anybody considering starting a new business or even for the do-it-your-self window cleaners. The technique to cleaning windows isn’t too difficult and most will master it with a few instructions, tips and most of all experience.

With experience you’ll develop a keen eye for detail and avoid leaving marks and streaks on your freshly cleaned windows.

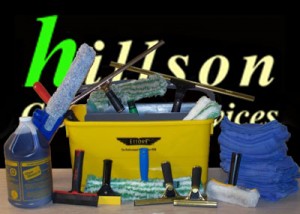
The equipment I use consists of:

Window cleaning bucket – these buckets are designed specifically for holding your cleaning solution, squeegee and washer. Sizes range from 10-20 Litres.

Window squeegee – for best results don’t skimp on your squeegee. Buy a good quality squeegee and replace the rubber blades often to ensure they have a sharp edge to them. Avoid using the rubber too long as they tend to become rounded and get nicks in them, this will result in poor performance leaving streaks on your window.

Washer with scrubber – this is used for applying the solution with a scrubbing pad on one side for removal of bulky and hard waste from the glass.

Handheld doodle bug – this holds a scouring pad to assist in removing grime from the glass.

Window cleaning solution – of course there are commercial glass cleaning products on the market but you can also create your own window cleaning solution from everyday household products that bring  your windows up a treat. There are many recipes available that you can experiment with that include ammonia or vinegar, however my preference is simply water mixed with a tbsp. dishwashing liquid and add a dash of methylated spirits.

Scrapper – not all debris or paint can be removed from the glass when cleaning so you will need to resort to the scrapper. Ensure blade is sharp and has no broken edges. Care must be used with this tool to prevent scratching your windows.

Ladder – *warning, beware, this is where window cleaning gets dangerous. Ladders account for many household/workplace accidents which can result in serious damage. The ladder I use has a Level-Eze Ladder Leveller.  Highly recommend as it assists in stability when on uneven ground.

Extension Pole – for those windows that are hard to reach, the extension pole is a godsend. They come in a range of sizes and can be used to attach your squeegee, scrapper, washer and brush. Cleaning windows from the safety of the ground.

Holster – the ideal holster will hold your washer, 2 different sized squeegees and a scrapper. This is perfect for ladder use with your equipment at your fingertips.

Cobweb Brush – this is a bristled brush to assist in removing cobwebs that are common around external windows. The brush can be attached to the extension pole for those places that are hard to reach.

Cloths – lint free white nappy cloths or microfibre cloths used to remove any unwanted streaks or water on your window.

Steel Wool Grade 0000 – for that added touch of class. After all is done and you stand back and admire your work, this grade steel wool will polish out most marks you discover, leaving your window blemish free.

So you want to start a cleaning business

Take a walk through any city. Wherever you find people working or families residing means there is cleaning to be done. With the rapid pace of life these days, more and more people are delegating their cleaning to others. Rather than hiring in-house, businesses are subcontracting out their cleaning duties whilst working mums are resorting to hiring cleaners to help maintain the household. There is plenty of work to be had out there, you’ve just got to work out a way to get it.

Starting your own cleaning business means you become the boss. To become successful you will need to develop business and organisational skills, communicate with clients and staff, manage your business administration, develop marketing plans and sell your service to prospective customers. Above all else is servicing the needs of your current clients. Obtaining a new client takes great effort, so protect your base, make every effort to ensure the satisfaction of your regular clientele. This gives you every chance that they will remain loyal and you will retain their business into the future.

Whilst there is plenty of work to be had, there is also plenty of competition in the cleaning industry, an industry often regarded as cutthroat. As an owner/operator establishing a new business be prepared to work long hours, working into the nights and on weekends. Be meticulous and reliable. With hard work comes experience. You will soon develop a reputation which you can then use when spruiking to potential clients.

Whether you are looking to start anew in the industry or already employed as a cleaner but wish to branch out on your own, remember that all businesses have small beginnings. My first job in the industry came about through a family contact. Your start may come from similar means, by word of mouth, by networking family, friends or work colleagues. Other techniques may include advertising, leaflet drops, selling your service door to door and to local businesses or online marketing. Whatever your method persistence pays and when that opportunity comes your way grab it with both hands and run with it.

To get my business up and running I first had to develop a business identity. This meant registering a business name, acquiring an Australian Business Number and organising business insurance. For marketing purposes I then designed a company logo and had printed business cards, developed a website and networked with local business. It was not long before Hillson Cleaning had a steady income from regular clients across a spectrum of industries.

With focus and a willingness to succeed your business is sure to steadily grow. Don’t limit yourself to doing all the work. In order for your business to truly thrive you will need to expand your operations. This can be done by employing staff and subcontractors, however be sure to monitor their work and that cleaning standards are upheld.

Good luck on your business venture and remember the harder you work, the more luck will come your way.